
My Closet
Hi everyone! So, I’ve been wanting to write a blog post dedicated to organizing your closet for a while now. If you follow me on social media you can see through my stories that I have been on an organizing bender for the last few weeks. That’s correct I said weeks! During this process, I have taken notes on my process and hopefully, I can teach you some helpful tips.
Okay to start who needs a bedroom when you can have a glam room. What is a glam room, you might ask? Let me define it for you.
glam·room
noun:
1. A customized room that sparkles; completely dedicated to accessories and wardrobe.
2. A chic extension of the walk-in closet for the stylish individual.
Just about every woman fantasizes about having the ideal closet which we often see on television shows. To refer to these glamorous rooms as “closets” is an understatement. But overall a glam room is something that is earned!
I decided to convert the guest bedroom into my personal glam room; and why not if you have space and own accessories equivalent to art? The reasonable thing to do is to display them properly, which they deserve. Would you put a Monet or a Picasso in a closet to gather up dust? No! Obviously not. Well, I think the same should go for Jimmy Choo and Gucci.
Even though these items may not be among your collection of clothing and accessories, it’s all about the appearance. We can take some helpful ideas and tips from these customized rooms for our own bedrooms and wardrobes to make Marshalls look just as chic as Prada. Our bedrooms are a reflection of ourselves, so we should try to mimic these glam rooms in terms of organization and how to display your own items. Look even if your closet is a mixture of brands it doesn’t matter how much it costs we should all take pride in all of our clothes, shoes, and bags. This means treating everything with respect and not just rolling clothes into a ball and throwing it in a drawer.
Organization is all in the details ladies, and that’s what a glam room is about. It’s a specific formula. Merchandising your best pieces to be showcased to draw the eye in on items you want to be displayed. The rest is color coordinating, while also pairing similar styles together to look more appealing.
So let me take you through the steps I took when I tackled my closet.
STEP #1: REMOVE ALL OF YOUR CLOTHES FROM YOUR CLOSET AND DRAWERS.
Put everything you own on your bed or even the floor depending on how much you have. Just get it all out of your closet or wardrobe so you can see everything you have in one space. It’s overwhelming at first seeing everything you own in one huge pile. It made me a little frantic because it seems impossible to even get started, but the idea is that you go through it one piece at a time.
I got this step from the KonMari method which was created by organizing guru Marie Kondo. She actually has a Netflix show and it’s totally addicting to watch! I highly suggest it, but I digress. Her whole philosophy is about keeping items that bring you joy, which is a genius way of putting it.
STEP #2: GO THROUGH EACH PIECE OF CLOTHING TO DECIDE ON WHAT YOU ARE WILLING TO LET GO OF.
We all know how difficult it can be letting go of our clothes, even if it doesn’t work for us anymore. Be brutal! Have you worn it in the last year? If not, let it go.
Looking at each item one at a time will make you reflect on how much you really need that piece. You don’t realize but the articles of clothing that are just taking up space are making you and your life feel more cluttered than it has to be. It might be painful at the moment, but once it’s gone it leaves more room for items that can “bring you joy” now!
STEP #3: SEPARATE THE ITEMS YOU’RE WILLING TO GIVE UP INTO TWO DIFFERENT PILES.
Make up bags for donations and one for dumping. Let’s face it, everything cannot be donated. Some items have seen better days and served their purpose. Let them rest in peace. The items that are going to be donated will serve their purpose for someone else who needs it. I brought all my donations to the Goodwill closest to me.
STEP #4: TAKE A GOOD LOOK AT WHAT YOU HAVE LEFT AND GO THROUGH IT ONE MORE TIME.
Go through everything one more time! I know this seems time-consuming and tedious, which it is, but it’s the only way to do it. Going through everything one more time will make you reevaluate the items that might be more difficult to let go of.
Let’s face it some pieces of clothes may not fit us anymore but they carry good memories with them. Keep one or two pieces just for the nostalgia they bring you. For the rest, you just need to give it up because it is taking up space. Some items you still might wear but they are basically falling apart. Some pieces were an impulse buy that you have never even worn. Or other pieces might be there in hopes that you will eventually fit into it again. Get rid of all those items.
Also, do you really need all those grey sweaters? How many white tee shirts can you have? By going through everything again you are really getting to where you need to be and also freeing up that valuable space.
STEP #5: CLEAN ANY DUST LEFT IN YOUR DRAWERS OR CLOSET AREA.
At this point go back to your closet and drawers to clean-up any dust or random items that have fallen through the cracks. You might be surprised at what you find. I often find money or change which is always a nice surprise! Or you could come across that belt that you were looking for two years ago. You never know, haha!
STEP #6: REEVALUATE THE SPACE YOU’RE WORKING WITH AND FOCUS ON STORAGE YOU CAN ADD.
Start by focusing on the storage for your accessories and clothes. This includes bins and basket organizers, display cases, cubbies, and clothing racks. You can get a lot of inspiration for the look you want by scrolling through Pinterest.
In most glam rooms the majority of clothes are hung up. This makes it easier for you to see all your clothes and to put outfits together. Bin organizers are great, but only use them for last seasons clothes as storage. Try to hang the items you get the most use out of, so you don’t have to pull apart every bin or drawer you have to find that one shirt you’re looking for. If you don’t have the closet space you can purchase individual garment racks from places like Bed Bath and Beyond to make your life easier.
Pottery Barn is a great place to visit for closet solutions, as well. They offer a range of different closet collections with a mixture of shelving and clothing racks. Each delivers a different style and designed to maximize your space. I’ll link a few of my favorites below.
- NEW YORK CLOSET COLLECTION – Limited Time Offer $79–$319
- BUILD YOUR OWN – SUTTON MODULAR CABINETS – Sale $189.99–$699
- DECLAN CLOSET ACCESSORIES – Limited Time Offer $59 – $209
- MIA MODULAR JEWELRY STORAGE COLLECTION – Limited Time Offer $29 – $29.50
If you find some of the Pottery Barn collections pricey Ikea is another great website to browse through.
STEP #6: ALL HANGERS SHOULD BE UNIFORM.
Velvet hangers are the best because they are non slip. You will need both regular and clip hangers. Make sure they are sturdy enough for your heavier items such as coats and jackets. Amazon has two great options for both; the Zober Non-Slip Velvet Hangers and these Velvet Hangers with Clips 20 Pack. Also, make sure they are the same color and they are thin. This allows your closet to be more pleasing to the eye and saves on space.
NO WIRE HANGERS!
I hope everyone got the reference, (cough) Mommie Dearest. If you’re still clueless you should click out of this blog immediately. Back to the point. Consistency is a big factor that comes into play. Most people overlook the important role hangers play in the look of one’s closet. Having the same hangers throughout your wardrobe will give it a more sleek look. Plus hanging up the majority of your clothes makes it easier to see what you have to wear. Often when I fold certain items I tend to forget I have it. You can also find the same velvet-like material hangers at any HomeGoods or Marshalls closest to you. I have to reiterate it’s all about consistency, and simplicity.
STEP #7: FOLD TEE SHIRTS AND TOPS SO YOU CAN SEE EACH ONE.

T-Shirts Folded
Folding t-shirts and tops can be tricky. There are many different ways to fold a shirt. Even if it looks pretty folding it a certain way does not guarantee that it’s easy to go through without messing up the whole pile.
The best way to fold shirts and t-shirts is to fold in half and then half again. Easy enough! Layer them next to each other. This allows you to see what you have instead of stacking and needing to look underneath items.
STEP #8: COLOR COORDINATE!

Color Coordinated Dresses
It’s the easiest way to do it. Trying to separate by winter/summer is exhausting. By organizing by color it is again pleasing to the eye and you only need to look in one spot. I don’t put things away by season. Living in Vermont you never know what the weather will be. By having everything accessible you won’t forget that you do have that big bulky sweater that you may need in June.
For example, with jeans, organize them by wash. Darker to lighter wash makes things look more organized. You can then organize by style, skinny/flare/boot cut, etc. Sounds time-consuming but it makes things easier in the end.
STEP #9: ORGANIZE BY ARTICLES OF CLOTHING.
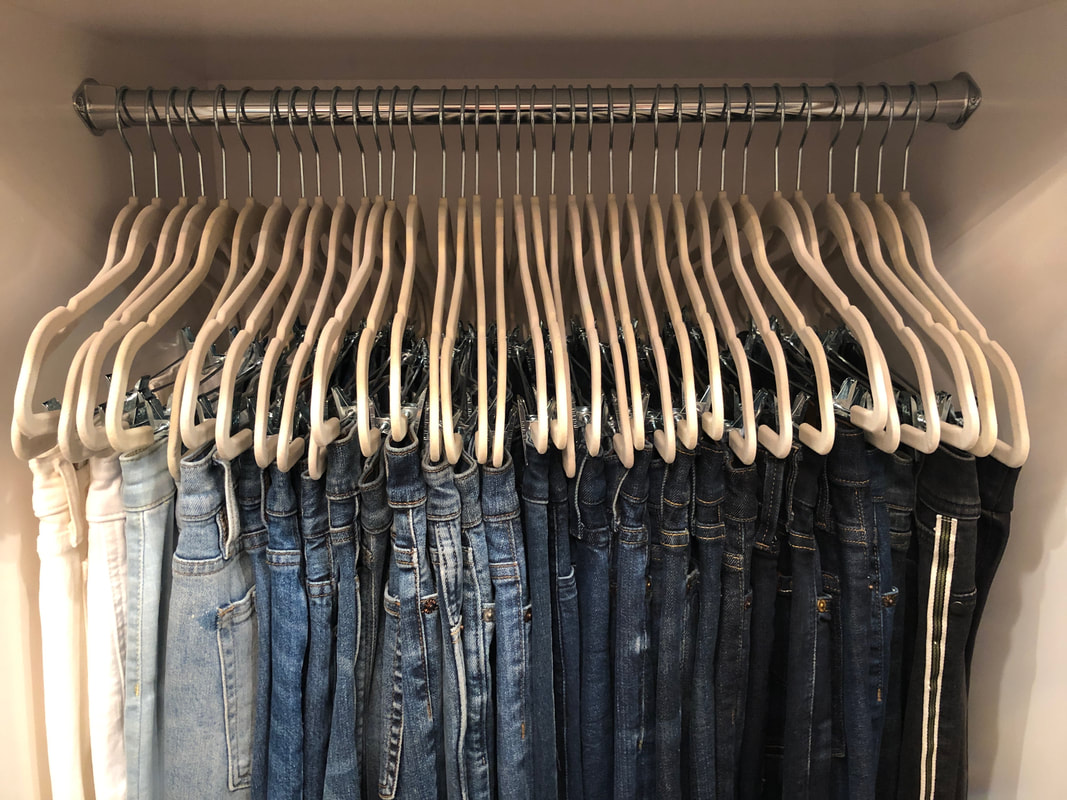
Section of Jeans
Pants go in one area together. Jeans in another. Sweaters in one area, and blazers in another. Skirts in another and so on. Again, this makes choosing an outfit easier when you have all your items organized this way. What I find helpful is also arranging tops and dresses by the length of the sleeve. This is helpful so your thin spaghetti strap tanks don’t get lost in the mix of long-sleeved tops.
So just to be clear here is how it should go:
- Separate by article of clothing – (these are the groups I make) pants, jeans, skirts, tops and tanks, dresses, blazers, jackets, and sweaters.
- Within each group organize them by the color – at one end I usually start with black and have white on the opposite end, in the middle is a color range based on what you have that should flow together
- Finish my organizing each group of tops, dresses, and jackets by the length of the sleeves.
STEP #10: MAKE A NECESSITIES DRAWER OR BIN.
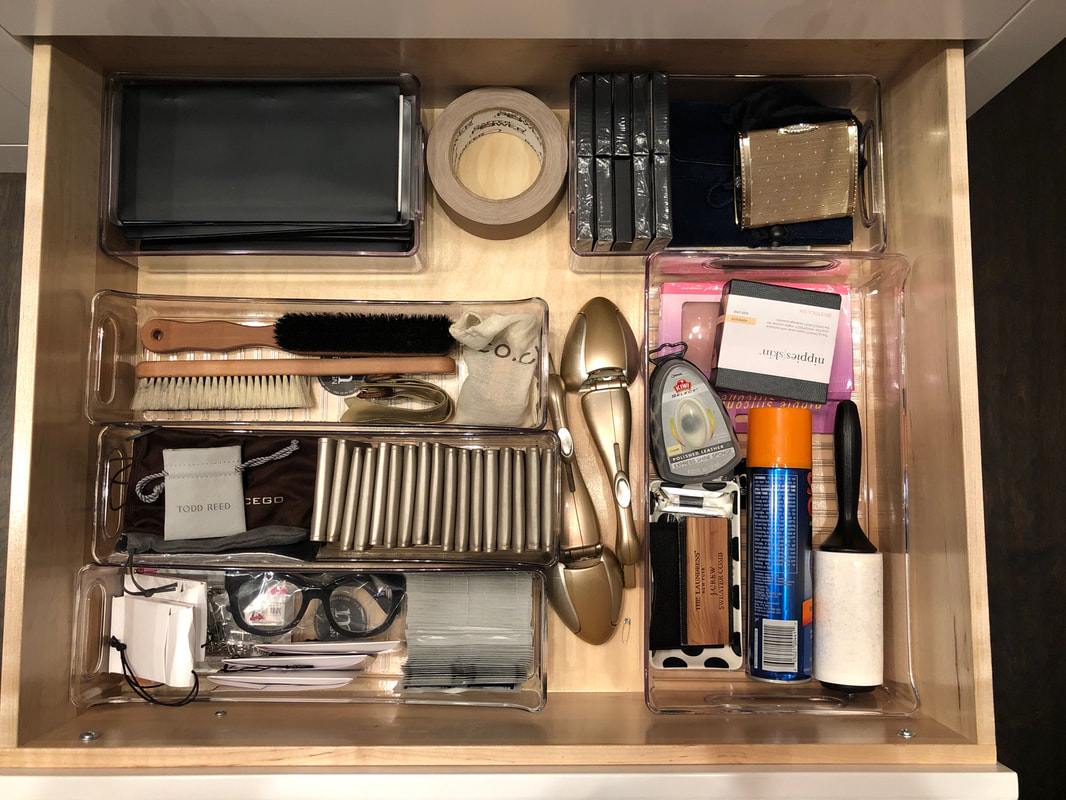
My Necessities Drawer
What I mean by this is keeping items such as clothing brush, link rollers, shoe care, scissors, safety pins, and double-sided tape in one specific drawer. Everyone has their own essentials they keep close by for when they are getting ready to contour the day. Having all these random items together in one place makes it much more easy! You’re not running all over the house looking for a safety pin when you need it!
STEP #11: DISPLAYING HANDBAGS.
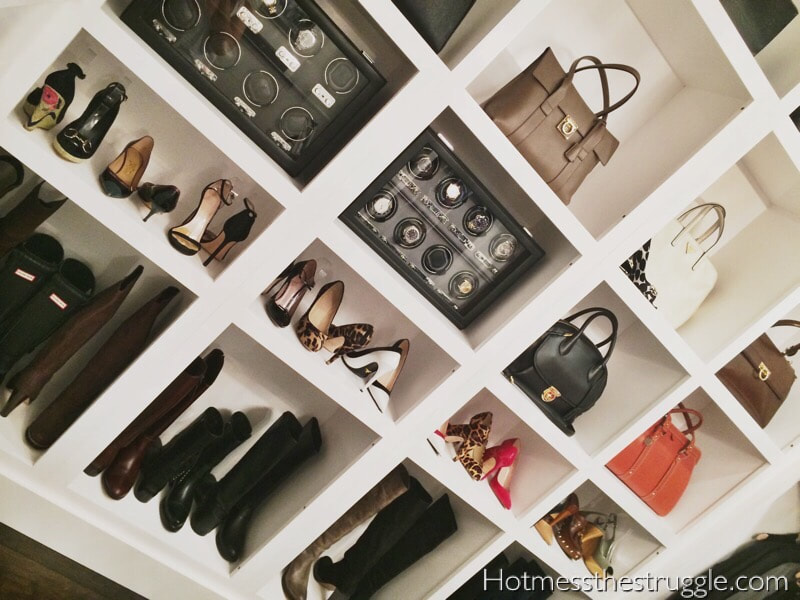
Handbags & Shoes Display
Here’s the deal with handbags. I love to see my handbags. I don’t use the dust cover bag that comes with it because it’s not convenient for when I need to find a specific one. I stuff my bags with tissue paper to keep their shape and makes it easier to display them.
STEP #12: ORGANIZING YOUR SHOES.
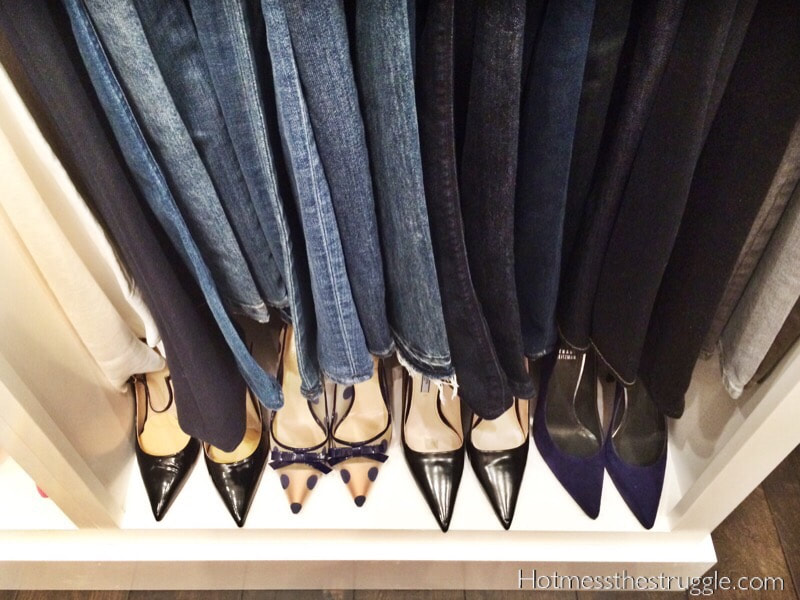
Organized Shoes
Shoes. I can give away clothing easy enough but I have a VERY hard time saying goodbye to shoes. I have a shoe thing but I know I’m not alone in this!
I organize my shoes by style than color. High heels altogether, then by color. Boots same, flats same and so on.
Now you might not have the floor space that I do to display each pair without stacking them. You want to be able to see all your shoes and at the same time keeping them clean and safe. I don’t suggest you get the shoe storage that hangs on the back of your door. They just don’t look nice and they don’t last. What I did was make cubbies in my closet, which you can do as well with this 12-Pair Shoe Organizer from the Container Store.
Another trick I have for storing tall boots is to put magazines inside of them. It keeps the boots upright and holds their shape. We all have magazines laying around the house so it serves two purposes. Clean up table tops and storage bins of old magazines and care for your boots at the same time.
STEP #13: CHOOSING ITEMS TO HIGHLIGHT FOR DISPLAY.
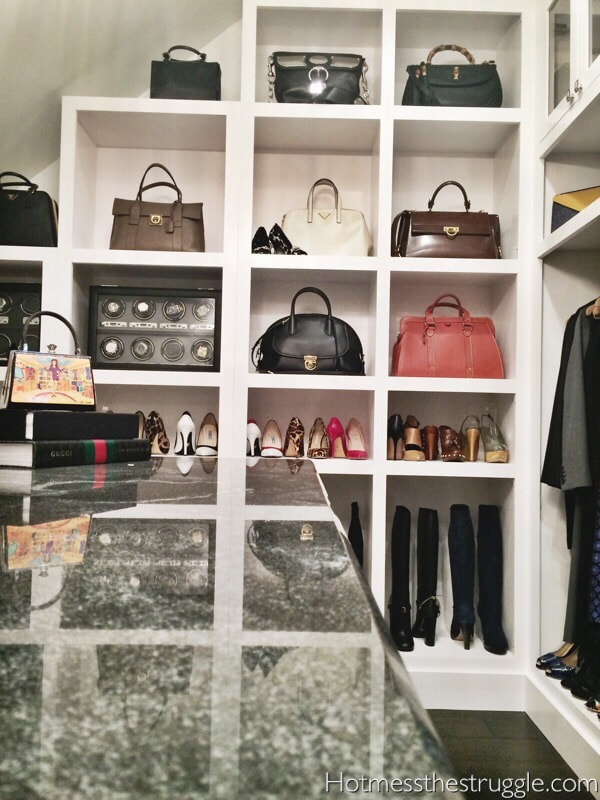
Shoes & Handbag Display
Simplicity means having a clean look. This rule of simplicity tends to be more difficult to follow. You might be like me and get a little carried away with decorating ideas, and most times this can look like a clutter of nice stuff. Picking the items to display might be difficult. You don’t want to neglect certain pieces or items, but you can always change things around with each new season.
Focus on neutrals such as white, black, or beige for the majority of your room. Also, silver furniture with glass accents can still give the classic look with a modern twist. Make these your main color schemes for your room and furniture, and then stick to one or two of your favorite colors to feature in the decor. Remember the majority of the decor is your own accessories. You should be focused on highlighting your best bags or hats.
Another reason you should keep things simple is that each glam room (or bedroom if it’s the case) should have a little sparkle. Shimmer and shine always trump color, aesthetically that is. I know that I already mentioned HomeGoods, but I got to say most of their table lamps emulate the same glitzy effect as any expensive chandelier. In general, a good tip I’ll give you is to stop in your nearest HomeGoods at least once a month. They constantly have new items in stock, and my favorite section to look at is their table lamps.
Keep in mind not to overdo it on the bling. One or two pieces is all you need. Once you finished off your room with some touches of sparkle and twinkle you can call it a day. Glam rooms are built-in home boutiques, but like I said it’s all about appearance. We can use glam rooms for ideas to make our own closets just as beautiful. Even though we might not have the budget to buy designer items that doesn’t mean we don’t love our thrift purchases just as much.
STEP #14: FINAL TOUCHES.
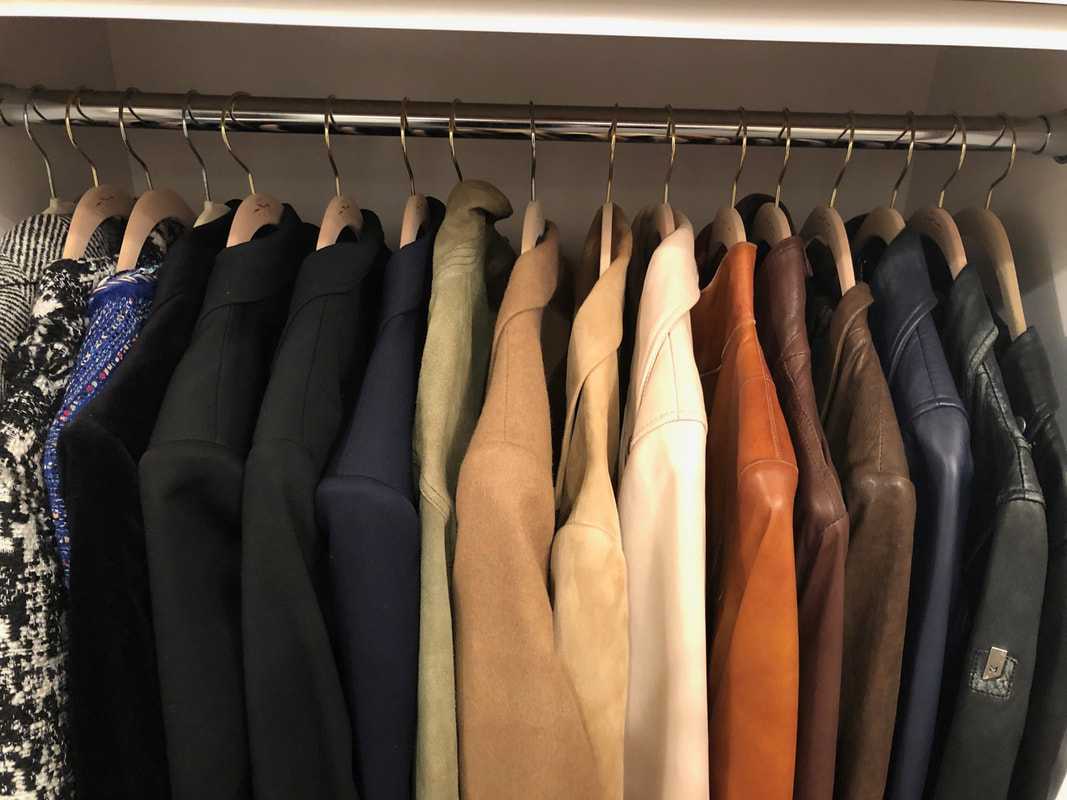
Blazers & Jackets
Straighten your hangers, leaving a finger width between each one. Sounds nutty and really OCD but again your clothes will look neater.
STEP #15: KEEPING EVERYTHING NICE!
Here’s the hard part. When you wear something – hang it back up at the end of the day! I’m not saying I do this all the time but it does make it much easier instead of having that big pile of clothes laying on a chair at the end of the week.
To sum it up, treat all your clothes as if they were expensive designer brands and put them on display. Let me know in the comments some of your favorite organizing tips.


0 Comments